A Website is Born
Starting a blog has been on my mind for a while. But I never found the courage to do it—until last Christmas. That’s when lthms published a blog post about deploying a website as a single binary with OCaml. The article ends with the website being deployed as a Docker image, which resonated with me since it overlaps with some of the work I do.
It got me wondering: What’s the minimum cost I could pay to deploy a website with a cloud provider like Google Cloud Platform (GCP)? It turns out, it can be free—or almost free. And what better reason to create a website than to see if that’s true?
Here’s what the GCP billing looked like after two weeks of deployment:
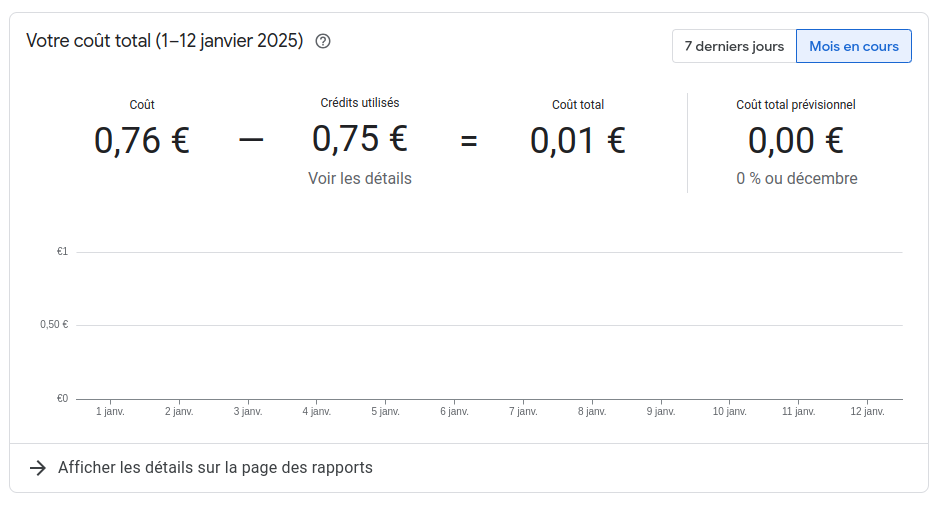
One cent for two weeks of hosting! This post explains how I made that
happen. If you love OCaml, you can check out the repository for this
website here. With
just one OCaml binary (deploy/main.ml), you can create,
update, and deploy the website in a single command! All you need are two
prerequisites:
- A GCP account with a credit card
- A Cloudflare account
Website Internals
The main constraint I set for myself was to build the entire website
in OCaml. Since it’s the language I use daily at work, I knew it would
minimize development time. While static site generators like
hugo or soupault might have worked, they
seemed overkill for my goals.
At the time of writing, the website is no more than 300 lines of OCaml code. Here’s what powers it:
- Server Framework: Dream
- HTML Generation: dream-html
- CSS Framework: Sakura with some custom tweaks
The content structure is hardcoded in bin/main.ml, and
pages are written in Markdown or JSON files stored in a separate
directory. Using ocaml-crunch,
everything is bundled into a single binary. Here’s an example of how the
index page is structured:
let index route =
  let open Dream_html in
  let open HTML in
  let main =
    match route with
    | Home -> main [] Home.html
    | News -> main [] @@ [ h1 [] [ txt "News" ] ] @ News.html
    | Software -> main [] @@ [ h1 [] [ txt "Softwares" ] ] @ Softwares.html
    | Archive -> main [] @@ [ h1 [] [ txt "All posts" ] ] @ News.post_html
    | About -> main [] @@ [ h1 [] [ txt "About" ] ] @ About.html
    | Post { filename } -> (
        main []
        @@
        match Assets.read filename with
        | None -> []
        | Some content -> [ txt ~raw:true "%s" content ])
  in
  respond
    (html
       [ lang "en" ]
       [
         head [] Head.html;
         body []
           [
             header [] (Header.html route);
             hr [];
             main;
             hr [];
             footer [] Footer.html;
           ];
       ])
Compiling and running the website is as simple as:
dune exec bin/main.exeAnyone can fork the repository, modify the files in the
assets directory, and deploy their version of the
website.
Why Docker?
I initially planned to deploy the website as a standalone binary on a GCP virtual machine, but Docker offered several advantages:
Simplified Dependency Management: Docker ensures all dependencies are installed and tested locally, reducing deployment failures when new dependencies are added.
Containerized Updates: Docker makes updates straightforward by isolating the application in a container.
Static Binary Creation: Generating static OCaml binaries can be tricky, requiring a dedicated
opamswitch. Docker simplifies this process.
With Docker, I created a lightweight container (about 40 MB) using
fewer than 20 instructions in the Dockerfile. To build and
run the image locally:
docker build -t website .
docker run --rm --name website -p 80:8080 website
While you can run these commands manually, the deployment script automates everything, as explained in the next section.
Deploying to GCP with Cloudflare
The GCP free tier includes a VM called e2-micro, which
can host the website for free under certain conditions:
- The VM must be deployed in a U.S. zone.
- It must not be preemptible.
- Usage must stay within limits:
- 30 GB of persistent disk
- 1 GB of outbound traffic (excluding China and Australia)
The outbound traffic limit posed a challenge. What if someone from China visits the site? Or worse, a DDoS attack generates excessive traffic? GCP doesn’t allow hard spending limits, so costs can spiral unexpectedly.
To mitigate this, I used Cloudflare as a CDN. Cloudflare caches the website’s content and provides DDoS protection—all for free! Here’s the setup process:
- Delegate your domain’s DNS handling to Cloudflare.
- Add DNS rules in Cloudflare to point to your VM.
- Configure caching policies in Cloudflare.
- Update your VM’s firewall to allow only Cloudflare’s IP ranges.
This setup ensures the website stays within GCP’s free tier.
For deployment, you’ll need:
- A Cloudflare account and API key
- GCP’s
gcloudCLI installed locally - A credit card linked to your GCP account
Once these prerequisites are ready, deploying the website is as easy as:
dune exec deploy/main.exe -- deploy create -vFor updates:
dune exec deploy/main.exe -- vm update -vThis last command performs the following actions:
- Builds the Docker image containing the latest version of the website.
- Pushes the Docker image to the GCP Artifact Registry.
- Fetches the Docker image on the VM.
- Restarts the website using the new Docker image.
Use this command whenever you want to deploy a new version of the website.
More details are and will be provided in the repository.
Conclusion
Starting this blog was an exciting journey, and I plan to regularly update it with new content. I already have a few ideas for future articles about the projects have made so far.
If you have questions or ideas, feel free to open an issue or contribute to the repository. I’ll keep this post updated with major changes to the deployment process.
Thank you for reading, and I hope this inspires you to deploy your own website!